Project Planning
Welcome to the New World ERP Project Planning Center (PPC) online guide. This guide introduces you to the setup and processing aspects of Project Planning Center.
This section focuses on the setup components necessary to utilize the Project Planning Center within New World ERP. This will include detailed information on “master files” that must be set-up such as Project Types & Activity Groups and will also include the security settings which will be utilized to enable workflow and tailor user options to your needs.
Project Planning Center Master File Setup
PPC Validation Set Creation
Four Validation Sets (VS), three required and one optional will need to be created to facilitate the Project Planning process.
- VS 343 – CD Project Planning Categories, required
- VS 345 – CD Project Planning Status, required
- VS 346 – CD Project Planning Inactive Reason, required
- VS 347 – CD Project Planning Classification, optional
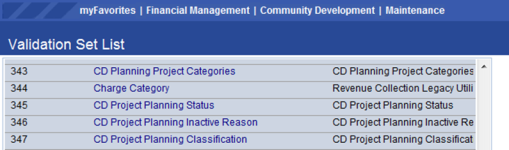
Maintenance>new world ERP Suite>System>Validation Sets>Validation Set List
To create the Validation Sets:
- Highlight the VS by clicking anywhere on the row.
- Click on the Values button.
- Input a value and description in the appropriate fields.
- Click Save/New and repeat until the list is complete.
- Return to the VS list and choose another VS until complete
Examples:
-
VS 343 – CD Project Planning Categories:
Planning & Zoning Projects, Engineering Projects, Building Department Projects
-
VS 345 – CD Project Planning Status:
Active, Approved,Closed Out, Denied, Expired, Under Review, Withdrawn
-
VS 346 – CD Project Planning Inactive Reason:
Building Violation, Zoning Violation, Delayed Plans
-
VS 347 – CD Project Planning Classification:
Downtown Development, Flood Plain Development, Historic District Development, Private Development
Project Planning Fees
Create a list of fees associated with projects.
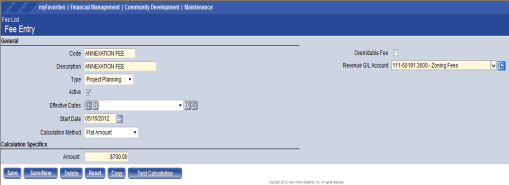
Maintenance>Community Development>Fees
To create a fee:
- Input the Code.
- Input a Description.
- Select Project Planning from the Type drop-down.
- Leave the Active box checked.
- Input a Start Date.
- Select a Calculaiton Method.
- Input the Amount.
- If applicable, check the Overridable Fee box.
- Input the appropriate Revenue G/L Account.
Repeat until all fees are created. Note that as the municipal fee table changes, new fees based on start date can be added (in advance, if necessary). This will maintain the history of the fees. The updated fee schedule will activate on the start date.
Project Counters
Administrators have the option to create their own Project Numbers or allow Logos to automatically supply a number to each Project. In order to set the Project Counter follow these steps:
-
Navigate to the Counters Module.
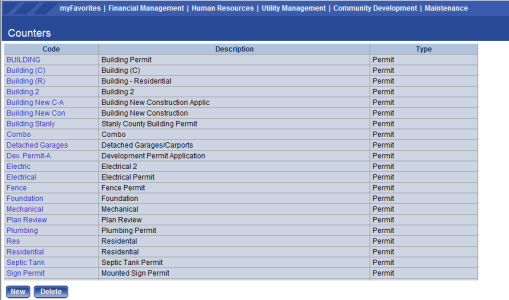
Maintenance>new world ERP Suite>System>Counters
- Click New.
- Input the Counter Code.
- Input the Counter Description.
- Select Project from the Type drop-down.
- Select the Start Month from the drop-down.
- Input the Annual Start Number.
- Click Save when finished or Save/New to create another Project Counter.
Note: Any number of Project Counters may be created. See the End User Guide for details on assigning Counters.
Project Activity Groups
Project Activity Groups, also known as Activity Templates, may be created. These templates, and their associated list of activities, will be saved and may be added to any Project Type. Creating templates ensures that activity lists used in several projects not need to be created repeatedly.
To create Project Activity Groups, navigate to:
Maintenance>Community Development>ProjectPlanning>ProjectActivityGroups
- Click New Group.
- Input the title of the Activity Group.
-
Click on the Activity Group to highlight.
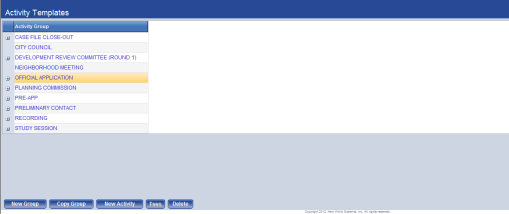
- Click New Activity.
- Input the Activity Name.
- If applicable, select an Activity Owner from the drop-down .
- Assign a sequence number.
- Assign the number of days to complete the project.
- If the activity is always required, check the Required box.
- Click Save.
Repeat the process until all activities are created.
Project Types
To create Project Types, navigate to:
Maintenance>Community Development>Project Planning>Project Types
- Click New.
- Input the Project Type Description.
- Select a Project Categoryfrom the drop-down.
- Select a Counter Number from the drop-down.
- If you would like the option of manually entering Projects Numbers, check the box.
-
Leave the Active box checked.
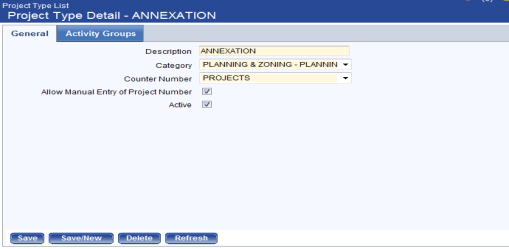
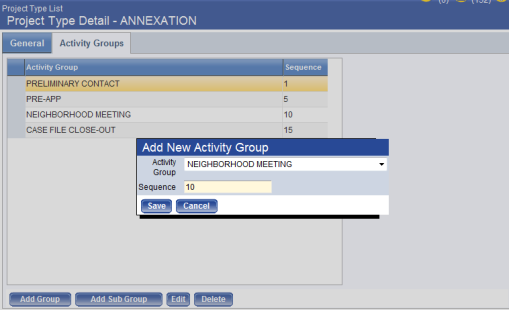
- Click on the Activity Groups tab.
- Click Add Group.
- Select the Activity Group from the list previously created.
- Provide a sequence number and click Save.
-
Repeat until all Activity Groups are added.
Project Planning Center Security
In order for users to be able to access the PPC, they must first be given Standard Permission to use the PPC, as well as User-Based Permission to the Project Types. These tables provide required security listings only. Please refer to the Logos Security Administration Guide for instruction on security setup.
PPC Permission Table Summary
Permission Type – Company Applications
Feature Group – CD Project Planning
| App | Component | Description | All | Add | Change | Delete | View/Use | |
|---|---|---|---|---|---|---|---|---|
| CD | CD Project Planning Listing | Provides the ability to access the list of Project Plans | X | X | ||||
| CD | Project Activity Groups | Provides the ability to access the list of Project Activity Groups | X | X | X | X | X | |
| CD | Project Planning | Provides the ability to access the Project Planning Center | X | X | X | X | X | X |
| CD | Project Types | Provides the ability to access the list of Project Types | X | X |
Permission Type – Company Documents and Notes
Feature Group – CD Project Planning
| App | Component | Description | All | Add | Change | Delete | View/Use | |
|---|---|---|---|---|---|---|---|---|
| Suite | Project Planning Documents | Provides the ability create or view Project Planning Documents | X | X | X | X | X | X |
| Suite | Project Planning Notes | Provides the ability create or view Project Planning Notes | X | X | X | X | X | X |
User-Based Security
User Based Security allows Administrators to determine which Project Planning Types Users will have access to. To provide User-Based Security navigate to:
Maintenance>new world ERP Suite>Security>User-Based Security
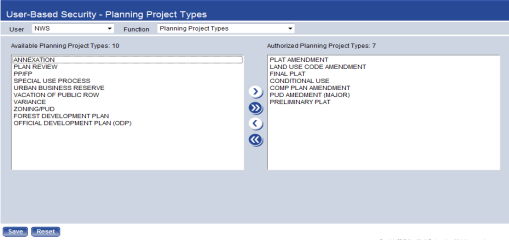
Do the following to Assign Project Types to Users:
- Ensure that the appropriate User is in the User drop-down.
- Ensure that Planning Project Types is selected in the Function drop-down.
- Move the appropriate Project Types from the Available list on the left to the Authorized list on the right. This can be done a number of ways.
- Double-clicking on a single Type will move it to the opposite field.
- Highlighting a type or number of types and clicking on the > button will move all selected Types to the right.
- Using the >> button will move all available Types to the right.
- Click Save.
This section describes the steps, workflow and options available in the Project Planning Center to the end-user. It will guide you through the process from Project Creation to its close. Included in the section will be a guide to the standard reports available in the software.
Search/Project Tabs
To access the Project Planning Center (PPC) navigate to:
Community Development>Project Planning>Project Planning Center
There are three tabs on the left side of the screen; Search, Project, & Activities
Search Tab
Click on the Search tab.
The Basic Search options include Name, Address and Parcel Number. This is a free form search and partial text is allowed. Note: If the box next to the Name field is checked the search will include all Names in the Project Name History. After entering your search criteria, click the SEARCH button at the bottom of the screen.

Advanced Search
To expand the search functionality, click on Advanced Search to illuminate the items that may be searched should the basic search function not be sufficient. After entering the search criteria, click Search.
Project Tab
To add a project, select the Project tab and click on Add Project.
This box will appear:
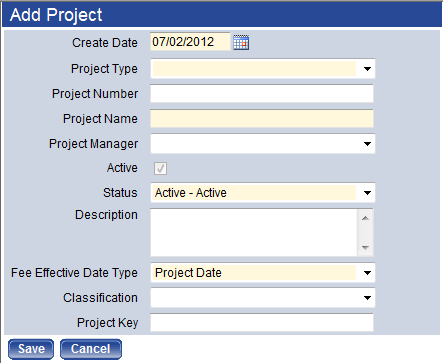
Fill out as much information about the projects as necessary, keeping in mind that the following are mandatory fields:
- Create Date
- Project Type
- Project Name
- Status
- Fee Effective Date Type
Click Save when all fields are filled. The Project Attributes will appear on the left with the project information fields appearing on the right.
Activity Search
To search for a specific project activity, select the Activities tab.

Options available when searching for a specific activity include:
- Owner of the Activity (The employee in charge of the activity)
- The Name of the Activity
- Current Status
- Related Professional(s) tied to the Activity
- Completed Status
- Various Due Date Options
Adding a Project
When a project is added in the PPC, a number of attributes become available. On the left panel, when the project is highlighted you will see the following on the right panel:
- A calendar paired with a field of upcoming events. These 2 fields are located on the left side of the right panel and work together as a team. When a date on the calendar is selected, the items in the upcoming list change based upon the date. Any activity in the upcoming list may be clicked on and that activity will open.
- An Activity Fee Summary graph showing unpaid (blue) and paid (green) fees
- A list of Project Contacts. Click on a contact to view the contact information.
- A Parcel Summary highlighting the parcels encompassed within the project
-
A Permit Status Summary highlighting any permits associated
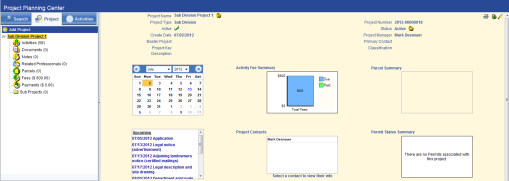
Also available in upper right hand corner of the right panel: 
- A Printer Icon that will allow the user to print out an activity report
- A Sub Project Icon, allowing for additional projects to be created under the current project
- An Edit Pencil, that will allow for changes to the Project Attributes
Activities
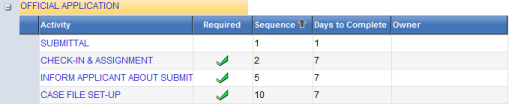
Click on the Activities link to highlight it. On the right panel you will see any preset Activity Groups that were attached to the project.

To add a another activity group to this list click on ADD GROUP.
Four icons are available at the end of the activity group line: 
-
The blue arrow opens the Activity Group and illuminates the individual activities assigned to that group.
Activities List

- The red X deletes the entire Activity Group from that project.
- The yellow file allows the user to add a Sub Group to the Activity Group for the project.
- The green plus sign allows for additional activities to be added to the Activity Group for the project.
Editing Activities
Click on any blue Activity Link, listed under Name to edit that activity.
The right panel will populate the editing options for the activity.
Activity Editing Panels
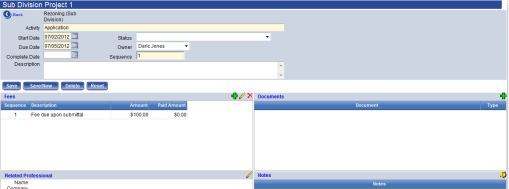
- Project Information Panel - The top panel allows for the addition of a completed date, an activity status and an activity description. Moreover, the Start Date, Due Date, Activity Owner and Sequence can be edited here. Lastly, the activity can be deleted altogether should the need arise.
- Fees Panel – Project Fees can be added, edited or deleted.
- Related Professionals Panel - One Related Professional per activity may be added.
- Documents Panel - Relevant Documents may be uploaded.
- Notes Panel – Add any desired free-form notes.
Remaining Project Attributes
Project Attributes
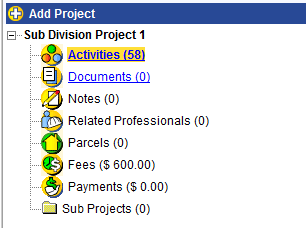
The remaining Project Attributes can be summed up as follows:
- Documents – Will display any documents uploaded into an activity.
- Notes – Will display all notes by Activity Group & Activity, allowing the user to access the Activity by clicking a link.
- Related Professionals – Unlike adding Related Professionals via Activity, adding them at the project level allows for an unlimited number of contacts.
- Parcels – Parcels with associated permits attached to them can be searched by date and listed under the Project.
- Fees – Fees will highlight any fees listed under the Project Activities and provide a link to the Activity.
- Payments – A list of Payments is available for quick viewing.
- Sub Projects – Any Sub Projects and their subsequent sub projects.
Reports & Inquiries
To create Project Reports, navigate to:
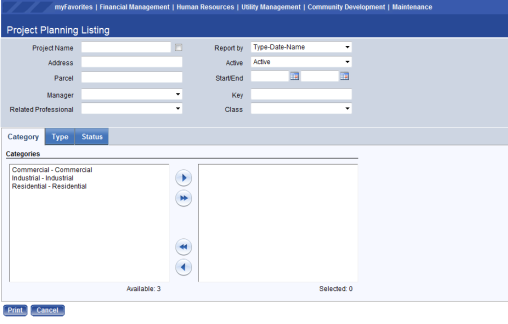
Community Development>Reports>Project Planning>Project Planning Listing
The Project Planning Listing will allow the user to create a variety of reports. Once the user makes their selections a report listing all of the Projects that match the criteria will automatically appear. The top portion of the screen contains optional items that can be selected to make the report more specific. The bottom portion contains three tabs, Category, Type and Status. One item from each tab must be selected in order for the report to print.